This blog explores the React JS component lifecycle, detailing the mounting, updating, unmounting, and error-handling phases. It provides practical examples and insights on how you can manage React components and enhance application performance.
Building dynamic and performant web applications with React depends on your understanding of the component lifecycle. With that being said, I want you to skim through the blog and take this guide as your roadmap for building top-notch web applications.
Let’s unpack the core concepts of the React component lifecycle with practical examples. By the end, you’ll be equipped with the necessary knowledge relevant to the component lifecycle in React JS. Let’s help you manage your React components with greater proficiency, regardless of your current experience level.
React’s popularity stems from its component-based architecture, making it a powerful tool for building user interfaces. Each component within React follows a defined lifecycle, consisting of distinct phases: mounting, updating, and unmounting. These phases collectively orchestrate the component’s existence, offering lifecycle methods that empower you to execute code at specific junctures.
Why is this important? Imagine you’re working on an e-commerce development solution and need to fetch product data from an API when the component first renders. Or when you need to clean up event listeners when a component is removed from the DOM. These tasks, and many others, rely on understanding and effectively using lifecycle methods.
Moreover, lifecycle methods are crucial when working with various technology solutions for business. They ensure your applications remain performant, reliable, and maintainable. By leveraging these methods, you can manage your component’s behavior and optimise performance efficiently.
What is the Component Lifecycle?
The component lifecycle in React refers to the series of events that start when a component is created and ends when it is removed from the DOM. These events are known as React Component Lifecycle methods, providing hooks for developers to run code at specific points in a component’s life.
For example, during the mounting phase, you might fetch data from an API or initialise a third-party library. The updating phase allows you to respond to changes in props or state, making it a crucial time for rendering updates or performing calculations. Finally, the unmounting phase is ideal for cleanup tasks, like removing event listeners or canceling network requests.
Understanding these phases is essential for React.js development companies looking to hire React.js developers for custom solutions. Lifecycle methods include componentDidMount, shouldComponentUpdate, and componentWillUnmount, each serves a specific purpose and manages the component’s behavior and interaction with the DOM.
In essence, the component lifecycle is a roadmap for React components, guiding them from birth to death with well-defined checkpoints. These lifecycle methods, also known as React lifecycle hooks, enable developers to control the component’s flow and enhance the user experience. Whether you’re working on custom WooCommerce development or cross-platform mobile app development, mastering the React component lifecycle is key to building efficient, robust applications.
Phases of the Component Lifecycle
The phases of the React component ifecycle dictate the different stages a component goes through, from its creation to its eventual removal. Mastering these phases is crucial for building robust, performant, and user-friendly React applications.
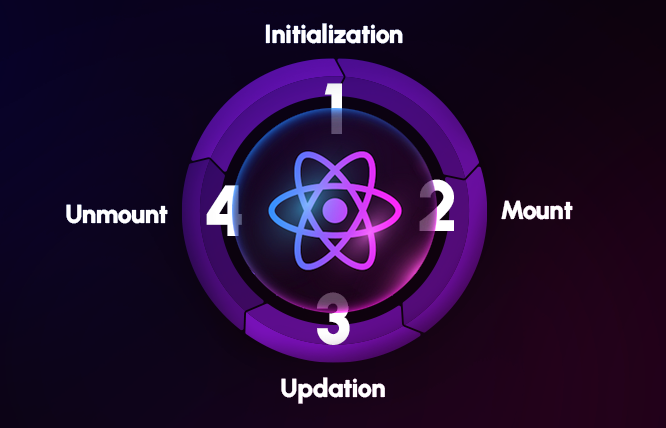
Let’s explore the four main phases of the React component lifecycle, along with the key methods associated with each:
Mounting Phase
The mounting phase is when a component is created and inserted into the DOM. Think of it as adding a new product to an e-commerce website. This phase includes several methods:
- Constructor: Initialises the component’s initial state and binds event handlers, like setting up a product’s core information like its price or availability.
- getDerivedStateFromProps: Syncs state with props if necessary, ensuring the component has the latest props before rendering.
- render: Returns the JSX to be rendered, determining how the component appears on the screen.
- componentDidMount: Invoked after the component is fully mounted. This is the perfect time to fetch additional data or set up subscriptions, akin to fetching customer reviews or inventory levels for a product.
Example
jsx import React, { Component } from 'react'; class Product extends Component { constructor(props) { super(props); this.state = { price: props.price, availability: true, reviews: [] }; } static getDerivedStateFromProps(nextProps, prevState) { if (nextProps.price !== prevState.price) { return { price: nextProps.price }; } return null; } componentDidMount() { // Fetching additional data like reviews fetch('api/reviews') .then(response => response.json()) .then(data => this.setState({ reviews: data })); } render() { return ( <div> <h1>Product Price: {this.state.price}</h1> <p>Availability: {this.state.availability ? 'In Stock' : 'Out of Stock'}</p> <ul> {this.state.reviews.map(review => ( <li key={review.id}>{review.comment}</li> ))} </ul> </div> ); } }
Updating Phase
The updating phase happens when a component’s state or props change, causing a re-render. This phase is like updating a product page based on user interactions, such as selecting a different size or adding the product to the cart. Key methods include:
- getDerivedStateFromProps: Syncs state with props before rendering.
- shouldComponentUpdate: Determines if a re-render is necessary, allowing you to optimise performance by preventing unnecessary updates.
- render: Returns the updated JSX, ensuring the component reflects the latest changes.
- getSnapshotBeforeUpdate: Captures information from the DOM before it potentially changes.
- componentDidUpdate: Triggered once changes have been applied to the DOM, suitable for performing tasks related to the modifications, such as adjusting the overall cost in the shopping cart.
Example
jsx import React, { Component } from 'react'; class Cart extends Component { constructor(props) { super(props); this.state = { items: props.items, totalPrice: 0 }; } static getDerivedStateFromProps(nextProps, prevState) { if (nextProps.items !== prevState.items) { return { items: nextProps.items }; } return null; } shouldComponentUpdate(nextProps, nextState) { return nextProps.items !== this.props.items || nextState.totalPrice !== this.state.totalPrice; } getSnapshotBeforeUpdate(prevProps, prevState) { // Capture the scroll position before the update return document.body.scrollHeight; } componentDidUpdate(prevProps, prevState, snapshot) { if (snapshot !== null) { // Scroll to the captured position after update window.scrollTo(0, snapshot); } if (prevState.items !== this.state.items) { const totalPrice = this.state.items.reduce((sum, item) => sum + item.price, 0); this.setState({ totalPrice }); } } render() { return ( <div> <h1>Shopping Cart</h1> <ul> {this.state.items.map(item => ( <li key={item.id}>{item.name}: ${item.price}</li> ))} </ul> <p>Total Price: ${this.state.totalPrice}</p> </div> ); } }
Unmounting Phase
The unmounting stage happens when a component is taken out of the DOM. It’s like taking a product down from a website. This stage contains a single important technique:
- componentWillUnmount: Used to clean up resources such as timers, network requests, or event listeners. Think of it as canceling any ongoing processes or clearing out temporary data related to the product.
Example
jsx import React, { Component } from 'react'; class Timer extends Component { constructor(props) { super(props); this.state = { seconds: 0 }; } componentDidMount() { this.timerID = setInterval(() => this.tick(), 1000); } componentWillUnmount() { clearInterval(this.timerID); } tick() { this.setState(state => ({ seconds: state.seconds + 1 })); } render() { return ( <div> <h1>Timer: {this.state.seconds} seconds</h1> </div> ); } }
Error Handling Phase
React provides lifecycle methods to handle errors in components. This phase includes:
- componentDidCatch: Catches errors in the component hierarchy, records them, and shows an alternative UI.
Example
jsx import React, { Component } from 'react'; class ErrorBoundary extends Component { constructor(props) { super(props); this.state = { hasError: false, error: null, errorInfo: null }; } componentDidCatch(error, errorInfo) { this.setState({ hasError: true, error: error, errorInfo: errorInfo }); // Log the error to an error reporting service console.error(error, errorInfo); } render() { if (this.state.hasError) { // Fallback UI return ( <div> <h1>Something went wrong.</h1> <details> {this.state.error && this.state.error.toString()}
Best Practices for Using Lifecycle Methods
Using lifecycle methods effectively can make your React components more efficient and easier to maintain. Here are some best practices:
- Keep Side Effects in componentDidMount and componentDidUpdate: Fetch data, set up subscriptions, and interact with the DOM inside componentDidMount and componentDidUpdate. This ensures these operations only run after the initial render or when updates occur.
- Clean Up in componentWillUnmount: Make sure to clear timers, subscriptions, and other resources in componentWillUnmount to prevent memory leaks. This is essential for applications that demand top-notch performance, like ones created by a dot net development company.
- Avoid Heavy Logic in Render: Keep your render method pure and free of side effects. Complex calculations and data fetching should be done in lifecycle methods, not in render.
- Use getDerivedStateFromProps Sparingly: This method should be used in rare cases where the state needs to be derived from props. Overusing it can make your component logic hard to follow and maintain.
- Use shouldComponentUpdate for Performance Optimisation: Use shouldComponentUpdate to avoid unnecessary re-rendering. This could be beneficial in advanced applications such as custom WooCommerce development.
Common Use Cases for Lifecycle Methods
Lifecycle methods come in handy in various scenarios during the development of React applications:
- Fetching Data: Use componentDidMount to fetch data from APIs. For example, a React.js development company might fetch user data when a component mounts.
- Managing Subscriptions: Set up subscriptions in componentDidMount and clean them up in componentWillUnmount. This is useful in applications like ecommerce development solutions, where real-time updates are critical.
- Updating the DOM: Use component Did Update to interact with the DOM after a component has been updated. This can be useful in cross platform mobile app development, where you might need to adjust the UI based on new props or state.
- Error Handling: componentDidCatch can be used to log errors and display fallback UI, ensuring a smoother user experience in robust applications, such as those created by technology solutions for business.
Differences Between Class Components & Functional Components
React components can be created using either class components or functional components. Here’s how they differ:
Syntax:
- Class Components: Use ES6 classes and extend Component. They have access to lifecycle methods.
- Functional Components: Use functions. With the introduction of React Hooks, functional components can now use state and lifecycle features.
jsx // Class Component class Greeting extends React.Component { render() { return <h1>Hello, {this.props.name}</h1>; } } // Functional Component const Greeting = (props) => { return <h1>Hello, {props.name}</h1>; };
State & Lifecycle:
- Class Components: Manage state with state and lifecycle methods like componentDidMount.
- Functional Components: Manage state with hooks like useState and useEffect, which can replace lifecycle methods.
jsx // Using useEffect in Functional Component import React, { useState, useEffect } from 'react'; const Product = ({ price }) => { const [reviews, setReviews] = useState([]); useEffect(() => { fetch('api/reviews') .then(response => response.json()) .then(data => setReviews(data)); }, [price]); return ( <div> <h1>Product Price: {price}</h1> <ul> {reviews.map(review => ( <li key={review.id}>{review.comment}</li> ))} </ul> </div> ); };
Performance:
- Functional Components: Generally, more performant due to less boilerplate and better optimisation with hooks.
- Class Components: May have more overhead due to the use of class syntax and lifecycle methods.
Usage:
- Functional Components: Preferred for simplicity and modern React practices. Suitable for PWA development services and other modern web applications.
- Class Components: Still useful for understanding React’s core concepts and in legacy codebases.
By understanding and leveraging these differences, developers can choose the appropriate component type for their specific needs, whether they’re working on a PHP development service, python development services, or microservices design and development.
Wrapping Up: Mastering the React Component Lifecycle
Having strong on the React component lifecycle – mounting, updating, unmounting, and error handling – is key to building dynamic and performant web applications. With proper knowledge, you may create well-structured React components that leverage lifecycle methods effectively.
Key Takeaways:
- Lifecycle methods provide you with control at crucial points in a component’s existence.
- Modern React favours functional components with hooks for cleaner and more concise code.
- Strategic use of lifecycle methods optimises performance and prevents memory leaks.
- Understanding both class and functional components equips you to choose the best approach for each scenario.
Ready to Take Action?
Now that you’re armed with component lifecycle in react js, put your newfound skills into practice! Experiment with building React components that utilise lifecycle methods for various functionalities. Remember, the best way to learn is by doing.
Frequently Asked Questions
The React.js component lifecycle is crucial because it helps you manage your components efficiently. Understanding it allows you to execute code at specific points, making your application more dynamic and responsive.
The mounting phase is when a React component is created and added to the DOM. It involves setting up the initial state, rendering the component, and running code after the component has been inserted into the DOM, like fetching data.
The unmounting phase happens when a component is removed from the DOM. This is where you clean up any resources, like timers or network requests, to avoid memory leaks.
During the updating phase, a component re-renders in response to changes in its state or props. This phase includes methods that let you control the update process, capture DOM information before changes, and perform actions after updates are done.
Choosing between React.js and Angular depends on your project needs. React.js is great for building fast, scalable user interfaces with a flexible component-based structure. Angular, on the other hand, offers a more comprehensive framework with built-in features like dependency injection and a strong typing system, making it suitable for larger applications. Consult with our professionals at FuturByte for more on this.
TypeScript is not mandatory for Angular, but it is highly recommended. Angular is designed with TypeScript in mind, and using it can help catch errors early, improve code quality, and enhance development efficiency.
Have questions or feedback?
Get in touch with us and we‘l get back to you and help as soon as we can!